Showing posts with label crafts. Show all posts

Thursday, February 14, 2013

Valentines

This might be the most eventful Valentine's Day I've ever had. But the biggest news is that I am a new auntie!! My older sister -- whose birthday happens to be TODAY -- had her second baby (boy) a couple of days ago, so our whole family is on a high right now. :-D

And in the spirit of sharing some love, this is the first year we made Valentines for my son's classmates. He was in a daycare last year, and I was totally "that parent" or "that mom" who didn't do anything special. In fact, I kind of forgot that it was Valentine's Day, so when I dropped him off and saw all the kids sitting down at their little tables with cupcakes in front of them, I was confused. Yup, that mom.

But this time, we printed out some cool Superman and Wonder Woman Lego Valentines and added a sucker for each of the kiddo's classmates. Look how cool they turned out!


I actually found this great idea (with the printable photos!) a year ago and managed to remember it in time. And since we got a color printer for Xmas, it was easy to crank these out. The hardest part? Getting my son to write the names of his classmates on the back of the photos. He's still shaky with the writing but also has a perfectionist personality; mix the two together and it can get a little ugly! However, it was worth it. I think these are awesome.


Speaking of which, here are more awesome Valentines. My mom gave my son some yummy See's chocolate in a heart-shaped box -- we demolished the chocolate pretty quickly. ;-) But I had to share this very cute Valentine box from my husband, who said he couldn't resist getting it for me since he knows how drawn I am to owls. And it is ADORABLE. I love how the owl's wings swing up to show the word "love" on its belly. And even better, the box is filled with yummy brownies and cookies from Mrs. Fields. (It's an FTD.com item that's no longer available.)


Finally, these two cards came in the mail for us. The one on the left is actually from my son, who made it in school (yeah, I'm just going to ignore the typo there). Then his teacher had him drop it off in the mailbox after it was addressed and stamped. That was last Thursday. Needless to say, we got the card a few days early.

The one on the right is from my friend Dorothy of the MotleyFlue, who is a huge lover of Valentine's Day and offered to send a card to anyone who wanted it. I asked her to send one to my son, and I just love what she wrote. What a sweet, lovely message. Thank you, dear Dorothy!


Happy Valentine's Day to one and all!

xo, Gladys

Monday, February 11, 2013

Sewing: Oliver + S Tote Redux

It was an unusually busy week for me last week, and only now do I feel like I can breathe deeply again. In between various errands, dental appointments, impromptu babysitting, an appointment with an accountant, a birthday lunch, a birthday party, and a school field trip with my son, I managed to squeeze in some time for a couple of sewing projects. Here's one of them, an Oliver + S Mother-Daughter tote (free pattern) for my niece's 8th birthday.


If that sounds familiar, it's because I used this same pattern before to make totes for my 9-year-old twin nieces last fall (all three young ladies are cousins). Here's the purple tote:


As you can see, I tweaked the pattern by using one large stripe for the middle instead of two smaller ones, and using the same complementary solid-color fabric for the bottom, top stripe, and handles. While I loved the original patchwork feel, I was going for a different, more elegant look. I was inspired by the dragonfly/butterfly fabric and knew that I couldn't simply use it as an unrecognizable stripe on the tote. So instead I decided to "frame" it and make it the centerpiece. (If you're interested in how I dealt with the dimensions, I simply added the height dimensions of the two middle stripes, from 3.25 inches each to one larger piece that was 6.5 inches. The height dimension of the lining had to be increased two inches to 23 inches. The rest of the dimensions remained the same, but the change resulted in a slightly taller tote than the original.) I think the tote turned out wonderfully, and this time around I was more meticulous about cutting the pieces and doing any necessary trimming as I went along so that the seam edges matched as closely as possible (though unfortunately still not perfect).


Here's a closeup of the awesome dragonfly/butterfly fabric, superimposed with different handwritten designs appearing to be the work of a natural historian or entomologist. The fabric design is both lovely and intellectual, and I thought it would be appropriate for a youngster who is exceedingly bright.


I don't have a photo of the inside lining, but for some fun I used this colorful stripey fabric which might look familiar to long-time readers. I used the same fabric to make an art smock from another Oliver + S pattern last summer. For this tote, I had the stripes going horizontally since it looked better that way. I wanted to use a colorful fabric for the lining because I personally get a kick out of seeing polka-dotted or brightly-colored linings in elegant leather purses or wallets. The contrast makes me feel like I've got a fun little secret, like when I wear bright patterned socks underneath pants or boots. Just one of the things that float my boat. :-)


xo, Gladys

Friday, January 25, 2013

Sewing: Wonder Woman Stuffed Pillow


This stuffed pillow was an Xmas present for Joanne, who is a huge Wonder Woman fan. (She's still on a search for the perfect Wonder Woman boots for her.) As you can see below, it was meant to be a stuffed doll. I bought the fabric from Spoonflower, and I was quite excited to make it. However, after I carefully cut out the front and back according to the directions, I found out to my deep dismay that they were not mirror images as they are supposed to be if you're going to sew them right sides together. Fabric design FAIL. So while it is a cute image and a great idea, you should know this before buying the fabric yourself.


What to do?

Well, it took me a while to commit to it, but I decided to applique the Wonder Woman cutouts onto fabric and create a stuffed pillow that would complement the birthday pillowcases I made for her. For added strength and to prevent the fabric from wrinkling while appliqueing, I used fusible web (Heat'n Bond Lite) on the backs of the cutouts, then I ironed the cutouts onto the pillow fabric.


Above is a closeup of the applique. Not too shabby ... but this is another skill that I'd like to practice and perfect.


Here are both sides appliqued. I pinned the fabric right sides together and sewed the edges of the pillowcase closed, but I left about six inches unsewn so that I could stuff the pillow.


Now time to stuff. These huge clouds were Poly-Fil and I used the majority of my bag. After stuffing, I stitched the opening closed by hand, using an even slipstitch.


All done!

Here's an iPhone photo of all of her three pillow(case)s together, courtesy of Joanne. (Nice Fluevog sandals, chica!)


xo, Gladys

Wednesday, January 23, 2013

Sewing: Pillowcases Galore

I made several pillowcases for holiday presents this past season. I'm embarrassed to say that one pillowcase took me until last week to finish, but they're all finally finished and mailed off. I'm saving the last-made one for a later post this week, but here are the rest. They are all fun in their own way.

Yoda


You've seen me make a pillow like this before ... except the back fabric is different, and at this point I've basically perfected the envelope pillow cover. I made this for my dear friend Dorothy (one of the MotleyFlue), who loves Master Yoda. The measurements on this baby are almost exact. French seams inside. I dig how badass Yoda looks.

Thomas and Friends


My nephew wanted another set of Thomas pillows for Xmas. I made a set using different fabric for his birthday last September, but I didn't blog about it. I sewed the previous pillowcases as envelope covers. These are more like the typical pillowcases that you buy, open with a wide hem on one end. I just used a standard-size pillowcase that we already had to create my measurements. Again, my measurements for these were meticulous, and they needed to be because of the directional prints.

Invisible Zipper


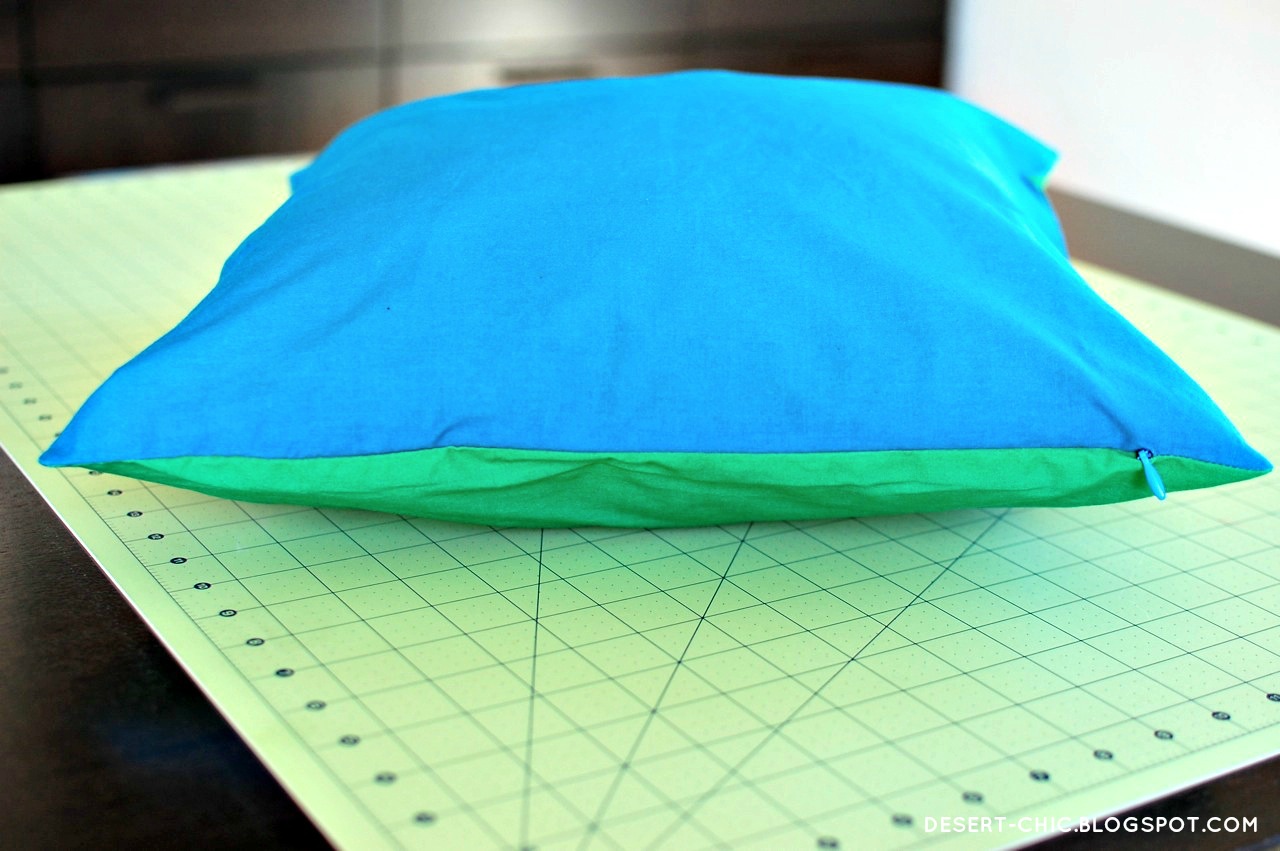
I made these color-block pillowcases for Joanne's birthday which was in early December ... and, um, she hasn't received them yet. (She'll get them along with her also-late Xmas present, hopefully by tomorrow.) She asked for simple pillowcases to brighten up her couch, but I couldn't make the easy version, i.e. envelope. I knew I needed to use zippers on these. Thing is, I'd never sewed zippers on the edges like this, and I'd never sewed invisible zippers before. I had to do tons of research and look through different tutorials online to psych myself up to do it. In the end, it worked, though I used a slightly different method for each pillowcase. The stuffed pillowcase above isn't how it's supposed to look, but I just wanted to show you how invisible the invisible zipper actually is. (It's supposed to look more full and stuffed; I used a smaller pillow form than what Joanne has, just for demonstration purposes.) I'm happy with the way they turned out, but I am planning to practice sewing more invisible zippers. It's not that difficult, but it is a somewhat fussy business, and this is one of the sewing skills I'd like to perfect ... because I am seriously planning to make a dress for myself in time for spring. :-)

xo, Gladys

Monday, November 12, 2012

Sewing: Piped Throw Pillow


I made this throw pillow for my mom's birthday recently, using the instructions from Deborah Moebes's Stitch by Stitch: Learning to Sew, One Project at a Time. I've done the easy projects in the beginning, but this pillow is past the middle of the book. The main features: piping along the edges and a universal zipper, both of which are skill-stretchers for me. (I made a skirt two summers ago with a zipper, but it didn't turn out as well as this one did.) I got the beautiful fabric on sale last December at the local quilting/fabric store here.


Confession: I had meant to make this for my mom last Christmas, but after I missed the deadline I kept pushing it back for almost a year. The fabric is even called Lumière de Noël by French General -- Light of Christmas. I did begin the project last December; I cut the fabric pieces and started putting the piping together, but I think it was because the piping was so fussy that I felt like abandoning the project.

So fast forward to this past weekend, which was my FINAL deadline for this pillow. The fabric pieces and half-pinned piping had been sitting neglected in one of my fabric bins for many, many months. I finally took the plunge and tried to sew the bias tape around the 1/4"-cord to make the piping. Second confession: while working on finally finishing the pillow, I wish I had abandoned it ... or at least made a sample pillow beforehand to test the instructions. Here are my reasons:

1) I used a slippery polyester (poly/cotton blend?) red bias tape that I bought in a package at Jo-Ann's.  It's 2" wide and is basically blanket binding. Next time I will use 100% cotton fabric for the bias tape, even if I have to make it myself. The pattern instructions strongly suggest the 100% cotton, but when I was planning out the project last year, I had no idea how to make my own bias tape. The slipperiness of the polyester made pinning and covering the cord very irritating. Fussy is the word.

2) The instructions in the pattern I used were confusing at times, even though I figured it all out in the end. Another thing I'd do differently is that I wouldn't baste the bias tape so close around the cord; some of the stitching shows up on the outside once you've put together the pillowcase at the end.

3) And, most critical, there was one very definite error that turned my pillow into the "shabby chic" thing you see here. Instead of trimming the seam allowance of the piping to 1/2", the instructions said to trim it to 1/4". (There was a photo of trimming the seam allowance that looked like 1/2" to me, but I figured, since I hadn't seen any errata about the book online, that the instructions were probably correct.) That's a big deal since it gave me a mere 1/4" of fabric to baste, pin, and sew three different layers together. NOT FUN. Also, instead of ending up with an elegant-looking fitted pillowcase for a 16" x 16" pillow form, I had a pillowcase that was about 1/4" loose all around, or a 1/2" loose each in length and width. Yeah, shabby chic. (Sure, I could have gotten another pillow form sized 17" x 17" but I didn't have time.)

4) Inserting the universal zipper turned out relatively well, but the instructions were a little confusing ... which part is the zip stop? which end is the top or bottom? (apparently the zipper pull is in the top position when closed, as seen below) ... I had to suss it out by looking at the photos. I'm just glad it worked out for me.


5) There were two different ways that the zipper foot for my sewing machine needed to be used: one way with the piping and another way with the zipper. The instructions weren't very clear on that. That's why I messed up on sewing across the zipper teeth. I didn't have enough time to fix it since all the mistakes pushed the project to the 11th hour already. And the inside/wrong side of the pillowcase is, whew, ugly.


HOWEVER, I did finally finish this project which was a long time coming. It feels good to be able to cross off something on my list that had been hanging over my head for almost a year. If I make another similar pillow soon, I believe I'd be more comfortable with the project, and I could get that fitted look instead. Hopefully everything would be neater as well.

xo, Gladys

Monday, September 17, 2012

Sewing: Monogram Appliqué Pillows


I made these for my soon-to-be-born twin nephews ... and I mean soon, like within the next couple of weeks! Our whole family is very excited, and this is just one of the projects I have in store for these boys.

For this project, I used the fabric that we employed as a table cloth for the June baby shower that we threw for the parents-to-be. For the appliqué, I decided to try out the felt that I had on hand (polyester) and found that it worked well. I washed and dried both the fabric and the felt beforehand.


This was my first time with sew-on appliqués, and yeah, I need to work on this particular skill. My appliqués ended up puckered at the corners and inside curves, and this puckered the background fabric as well, which made pinning the front to the back pieces a little finicky. But I still liked the way the pillows turned out, homey and fun. I mean, who doesn't like mini-pillows? They're so cute! My son liked them so much he asked for one of his own and even picked out the fabric already. :-)


I used my French seam envelope cover tutorial but made an important edit to the process (I've updated the tutorial): how to create sharper corners when using French seams.


A) Basically, once both front and back pieces have been prepped and pinned together, you sew around the edges not continuously as I had previously done, but creating four separate seams (one on each side) that stop and start about 3/8" from the edges. You need to backstitch at the beginning and end of each seam. To speed up the process, you can use the "chain piecing" method wherein you don't snip the threads before before turning the corner and starting the next seam.

B) Once all four sides are seamed, flip the pillowcase inside out and make sure the corners are opened out (there should be a hole at each corner). Iron the edges flat.

C) Then you can sew around the edges continuously with the designated seam allowance, pivoting the fabric as you turn each corner. After that, snip the unseamed corners to reduce bulk, making sure not to cut into any seams.

D) Flip the pillowcase right-side out, use a knitting needle to create sharp corners, stuff the correct-size pillow in there, and you're done!

xo, Gladys

Wednesday, September 5, 2012

Sewing: Oliver + S Mother-Daughter Totes

I sewed up a couple of multi-fabric tote bags for my identical twin nieces' upcoming birthday celebration. The pattern I used is another FREE pattern from the fabulous Oliver + S. For the first niece, I used different fabrics in her favorite color pink with a plain pink inside lining:


And purples and blues for the second niece, with the most adorable owls inside to make up for the plainer designs outside:


Process notes:

These totes took me longer than expected to make -- not including the time it took to choose and buy the fabrics, then wash/dry and iron them. In addition to cutting out several pieces from many different fabrics (for each tote: 5 different fabrics plus interfacing), I also needed to prep the fabrics with the fusible interfacing before I could start sewing. The interfacing I bought required steam-ironing using a dampened press cloth or ironing cloth. All in all, the cutting took over three hours, pressing the interfacing took about two, then sewing each tote took two to three hours. My least favorite part was the measuring and cutting, and many of the pieces ended up with slightly-off measurements, ending up as parallelograms or trapezoids instead of perfect rectangles. Unfortunately, although they didn't ruin the totes, those slight mis-measurements showed up in the finished product when some of the stripes didn't match up exactly. :-( It's possible to straighten them out while sewing each stripe on by measuring and trimming as you sew, then also trimming the lining to match the new measurements of the outside bag. I didn't do a very diligent job of that on my first tote. Oh well.

Also, I wish I'd known ahead of time that I needed to cut the interfacing 1/8" smaller all around which would have saved me the time it took to trim down each piece of interfacing while I was ironing them on. So be warned.

These tote bags are definitely not perfect, but if you don't look too closely they're cute and they'll do the job they're made for, which is toting your stuff around. All of that interfacing makes for very sturdy straps, pocket, and outside bag. My favorite is the purple and blue with the owls inside. :-)

xo, Gladys

Monday, July 2, 2012

Tutorial: Star Wars Envelope Pillow Cover

(ETA: I've updated this tutorial to create sharper corners while using French seams. See steps #5-8.)


With Darth Vader this time! (See my Yoda pillow cover here.) This was for a 6-year-old boy's birthday. Lots of boys in my life are digging Star Wars right now, which is nice because I'm digging it, too. :-) He got some Star Wars LEGO sets for his birthday this year, so I thought I'd augment those with a pillow. I asked his mom if he'd prefer Yoda or Vader, and she said Vader. The Darth Vader panel looks kinda retro with the flame-y lettering and the cheesy lava in the background, but the character after all was born in the late-1970s. Overall, I'm liking this vibe. (And, you know what, I don't think I ever realized just how skeleton-like Vader's mask has always been.)

Note: I hesitated to call this a tutorial because 1) it's so simple and 2) lots of tutorials for envelope pillow covers are all over the internet. However, because it had been a month since the last time I made a pillow cover, I felt like I needed a refresher. And since I liked the way I did it last time -- French seams and all -- I thought it would be a good idea to put together a more thorough post on making a pillow cover, at least for ME in the future, hence the use of the word "tutorial." If you have any questions or would like to point out any confusion with my instructions, let me know in the comments or via email. Thanks!

Envelope Pillow Cover Instructions
For a 16" x 16" square pillow form*

Fabric:
  • 17" x 17" square of fabric for the front
  • 17" x 22" rectangle of fabric for the back (if your fabric pattern is one-directional, make sure that the fabric dimensions are 17" wide and 22" tall)
* If you want to use a different-size pillow form, remember to add an inch to both the wide and the tall dimensions for the seam allowance. For example, for a 20" x 20" pillow form, your front fabric dimensions will be 21" x 21", and your back fabric dimensions will be 21" wide x 26" tall.


Method:

1. Cut your back rectangular fabric in half width-wise. You should now have two pieces measuring 17" x 11" each. These will overlap to make the "envelope."


2. Hem the bottom of the top piece: fold and press to the wrong side by 1/4". Fold again and press by 1/2", and pin. Edgestitch at the inside folded edge (i.e., sew close to the edge). Hem the top of the bottom piece in the same way. Don't forget to backstitch at the beginning and end of your seams.

This time I double stitched my hems, about 1/4" apart, for extra security. I sewed the first seam with a smidgen more than 1/4" seam allowance, and then I edgestitched the second seam. See a closeup of how it's supposed to look here.


3. Wrong sides together, align the bottom back piece with the front fabric. Pin along the bottom edge.


4. Wrong sides together, align the top back piece with the front fabric, overlapping with the bottom back piece. Pin along the top edge. Then pin along the sides, making sure to catch all three layers when you pin the overlapped back pieces. Pin the middle of the envelope for more security while sewing.


5. Sew around the edges with a 1/4" seam allowance, creating four separate seams (one on each side) that stop and start about 3/8" from the edges. You need to backstitch at the beginning and end of each seam. To speed up the process, you can use the "chain piecing" method wherein you don't snip the threads before before turning the corner and starting the next seam. (See photo below.)

6. Trim the edges down to 1/8".

7. Once all four sides are seamed, flip the pillowcase inside out and make sure the corners are opened out (there should be a hole at each corner; see photo below). Press the edges flat as close to the seam as possible. You can use the dull point of a knitting needle to help with this.

8. Sew along the edges continuously with a 1/4" seam allowance, pivoting at the corners and backstitching at the beginning and end of the seam. After that, snip the unseamed corners to reduce bulk, making sure not to cut into any seams. (See photo below.)


9. Flip the pillowcase right-side out, use a knitting needle to help push out the corners sharply (though be careful not to poke a hole through the fabric), stuff the correct-size pillow in there, and you're done!


I really love how clean the French seams look. Although I put this tutorial together mostly for me, I hope it proves useful for you, too. May the Force be with you on your sewing projects. :-)

xo, Gladys

Thursday, June 28, 2012

Jennifer Crusie Crochets

It's not everyday you find out that one of your favorite authors -- who wrote the most perfect romantic comedy novel ever -- crochets ... much less that SHE CROCHETS STEAMPUNK DRAGONS AND BUNNY SLIPPERS. She says she did this as part of her brainstorming/story-making process and calls it "yarnstorming." (Sounds like barnstorming, ha!) Could she get any cooler?

Oh wait, you haven't seen how amazing her crocheted creatures are:

Nelson, the dragon

Lefty and Bob, the bunny slippers

These guys, in her story, were real people whose souls/hearts were trapped inside these items by a mad, mad inventor. So, yeah. Jenny Crusie just got that much cooler. Way cooler. Too bad I can't get Nelson the dragon included when I buy her books. LOVE HIM. And I totally want to read that (not-yet-written) steampunk book right now. :-)

Go read her super-fascinating blog post with a couple more photos of her fabulous crochet yarnstorming projects. I wish I could undertake projects like this that helped me write that novel I've been meaning to write forever now. Sigh.

xo, Gladys

Wednesday, June 27, 2012

Project: Compost Bin

We left our old compost bin in our previous house when we moved into this one. But instead of buying another bin, my husband liked the idea of making a new one, this time out of wood. Our previous bin was made of ugly black plastic and cost just about as much (if not more) than the wood did for this project. It was also a little scary to open because you didn't know what was inside and sometimes big old flies buzzed out into your face as the lid popped up. Yuck. Plus it didn't work all that well. I don't think we ever used any of the compost that came from that old bin but it sure made the weeds around it REALLY happy.

Anyway, he found suggestions online and decided to create a modular bin so that we could make it as big or as small as we needed; and if any one section somehow got ruined we could replace it more easily than remaking the whole bin.


I think it looks lovely. I helped with drilling (yay, no wounds!), screwing nails, and sanding, and then I helped finish the wood with shellac, a safe and edible option. I had the hubby add the mesh on top (it's stapled on), so that animals can't easily jump into it and make messes. We had that problem with the garden; we might as well prevent the same problem from happening here. We'd prefer that worms do the bulk of breaking down the compost. The mesh won't prevent smaller animals from getting in between the modular bands, but if necessary we can narrow the gaps by trimming the legs of each band.

I hate throwing away vegetable and fruit peelings in the trash because 1) it's such a waste not to recycle them especially when we have a garden and other plants that can use the compost and 2) they smell up the whole kitchen and house. I'm really happy to have a compost bin again, especially a nicer one this time that makes me proud to look at it. (Great job to my better half!)

xo, Gladys
Related Posts Plugin for WordPress, Blogger...