Wednesday, May 30, 2012

Happy Snapshots: May

Getting his hair cut summer-short

Camera shy

Kiddo with his Bear-Bear (BB for short)

Potted cilantro

Tiny bird's nest with playdough eggs

BLT (no bread) topped with homemade olive oil mayo

Delicious pineapple cut Filipino-style by my mom

Big box of sweet, organic nectarines

Finally, I have to include some photos of our super-fun Memorial holiday pool party. These were taken with the hubby's new (bought used) waterproof Pentax camera. Our verdict? It is one great camera. (Plus, it is conveniently small and takes videos, too!)

Dragon rider (a couple of water drops on the lens, oops)

Inner tube rider

I couldn't help myself. That thing was cool!

Spa fun

Roasting s'mores

Gooey goodness

xo, Gladys

Monday, May 28, 2012

Matching Greens

Oh my gosh I actually have an outfit post for you today! Well, a little one. We went to my great-aunt's 87th birthday party yesterday, and these were our party clothes.

Top: C.luce via ModCloth | Skirt: Kamiseta (Philippine brand purchased in Manila in 2001 or 2002) | Flats: Blowfish via TJ Maxx

Simple and sweet, right? (Yes, we gave the kiddo a crew cut for the summer!) The skirt is too long for my taste but I bet it would look more stylish with heel sandals. This is one of those pieces of clothing that I rarely ever wear; it takes on sharp wrinkles in the washer/dryer and, frankly, I am too lazy to iron it properly each time I want to wear a skirt. But I'm so glad that I never gave it away. I never really had a top to go with it until I bought this forest green one a few months ago (one of my current favorites that always gets a compliment or more each time I wear it). I usually wear the top with jeans, but the skirt seemed so perfect with it, matching greens, that I made the effort to steam iron it. Very glad I did! The whole outfit looked much dressier with the skirt.

This outfit reminds me to get more green clothes, and hopefully green pumps or flats.

Bonus photo of me with one of my favorite ladies, my second-cousin-in-law (i.e., my second cousin's wife):


xo, Gladys

Sunday, May 27, 2012

A Little Relief


I didn't want the previous post to be my last impression of this week, especially because I do feel better today. Not only did we make a serious dent in cleaning up the house and yard (special thanks to my mom for coming over to babysit AND help clean!), but I also managed to finish part of a small sewing project yesterday -- shortening the hem for my friend's pants. It wasn't a difficult project but it was time consuming. It required a lot of seam ripping and careful measuring. I also decided to sew two seams 1/4" apart to replicate the original look for each pant leg, which meant sewing carefully. I think it turned out well, and I think I'm getting better at sewing straight lines. :-) Now I just have to finish her second pair of pants.

I'm realizing more and more how happy I feel when I'm sewing something. It's nice to have a tangible, finished product at the end of a project that doesn't have to be done again the next day or the next week. And if it turns out well, all the better.

Happy holiday weekend!

xo, Gladys

Friday, May 25, 2012

A Little Blue


I wish I had an outfit post for today, but I won't lie, it's been a rough week. It's been a rough month, actually. I haven't had a free weekend in what feels like forever (maybe early April?), and I had an annoying project, not sewing- or craft-related, that I had to work on this week that took up way too much time and brain usage and stressed me out to boot.

Ever since I got back from my Bay Area trip, I also haven't been able to get a handle on cleaning the house. It's really difficult for me to clean when I have a pre-preschooler at home who doesn't have any other playmate but me. I already regularly ask him to "help" with preparing meals and with putting his toys away when the house looks like Toys R Us exploded inside it, but it took a long time for him to willingly to help out (yes, I have resorted to threatening to throw away any toys that aren't put in a box). It's only recently that I've also figured out that having him help with more-involved household chores is a form of teaching, especially now that he's four years old and a little more articulate and methodical in his reasoning. It keeps both of us engaged with each other while the chores actually get done -- maybe not well, but well enough. For instance, just last evening I had him help me clean all the toilets in the house. I put the cleaning liquid in the water and let it sit, then we both scrubbed the bowls with the toilet brush (kid hand over mama hand) and used disinfectant wipes on the rest of the toilet. It didn't take too long, moving from one bathroom to the next, and I felt really good about having cleaner bathrooms.

Then we played Harry Potter LEGO on the Wii for the next hour until it was bedtime.

There's plenty left in the house to do. Not only do we have to reduce the clutter and wipe everything down, we also have to contend with the fact that we're still not yet completely moved in. We're having family and friends over for BBQ and swimming on Memorial Day, and we have to hustle to get the whole house in decent shape again before then. The hubby is spending a lot of time making sure the pool and spa are safe to go in, and he's been working (successfully) on clearing out the garage. He'll have to deal with the BBQ on Monday as well. I'm sure Monday will be fun, as hanging out with family and friends almost always is. They're not the kind of folks who turn a critical, judgmental eye on our hosting skills. All the same, I want to clean the floors before they get here.

But I have to admit, I plan to savor this weekend even though we'll be up to our necks trying to finish our spring cleaning. In June, I have to go to baby showers three weekends in a row, and I'm helping put together two of them. Yikes! After the holiday, things will really be non-stop around here.

(/end navel-gazing and complaints) Anyway, I know these are "first world" problems and I'm a lucky person. I just wish I was more productive and able to do MORE with my time and resources. In fact, I wish I had been able to sew something and/or take a huge chunk out of my mountain of chores this past week instead of working on that annoying project. Thanks for reading to the end. More importantly, have a happy holiday weekend (if you're in the U.S.).

xo, Gladys

Wednesday, May 23, 2012

My Crafty Better Half: Fir Cone Square Shawl

A few months ago, I mentioned the large shawl that my husband knitted for his mother about eight or nine years ago (btw, I said it was Irish but it's actually a Scottish pattern). It is still lying in pride of place on a couch in her living room, never used and rarely touched. However, I asked to take photos of it so that we'd have a record of what it looks like. I want to share them with you here.

This is my 6-foot-tall father-in-law holding up the unfolded shawl. This gives you an idea of how large it really is.

As you can see, the pattern is very complicated. It's hard to imagine how someone, just a few months after learning how to knit, could put together such a huge and complex piece like this. But he prepared for it so methodically. He found the pattern he wanted -- the Fir Cone Square Shawl -- in a library book, Folk Shawls: Twenty-five Knitting Patterns and Tales from around the World by Cheryl Oberle. With some cheap yarn, he made test squares of the border and part of the body to make sure that he was doing the pattern properly. He had trouble at the corners but he figured out how to make the corrections himself. After that, he bought the expensive yarn that he wanted and he set to knitting, several hours a day while in the middle of looking for a job at the time.

It is a stunning work of art and craft. If he hadn't gotten a job that required us to move, we wouldn't have packed up all of our knitting needles and yarn, and he may have continued with his knitting and made more such pieces. At some point, I'd like to take up knitting with him again, and this time I'd ask him to help me choose more interesting patterns than a dinky little triangle shawl that I made over and over again with different cheap yarns. Geez, the difference between our knitting sensibilities was embarrassing. O.o

xo, Gladys

Monday, May 21, 2012

Sewing: Star Wars Envelope Pillow Cover

(ETA: I now have a step-by-step tutorial on making an envelope pillow cover with French seams.)


This was the next fun project I did after finishing the art smock the week before:

Yoda Jedi Master pillow cover

Making envelope pillow covers is fast and easy -- perfect for beginners. I made this pillow cover using two different Star Wars prints (purchased here) for a nephew's 5th birthday. I'd do a tutorial but there are so many good ones out there already. Here's a quick video tutorial to show you the basics of making a simple cover so you know how many steps it takes and what the project is supposed to look like during construction. (For instructions on making one with trim, see here).

The only things that I did for this pillow that required extra steps were to 1) measure and cut out my fabrics in a specific direction (in this case, both the Yoda panel and the back cover fabric had prints that worked best in one orientation, right way up) and 2) use French seams in the construction.

The size of the Yoda panel dictated the size of the pillow. Thankfully, it was almost perfect for a 16" x 16" pillow form. Given the size of the pillow form, you need to add an extra square inch to the fabric dimensions to get the correct size for the front cover. In this case, I needed to cut a 17" x 17" square of fabric. Cutting out the panel was a little dodgy because it wasn't printed on the fabric perfectly straight; if you look at the finished cover closely at the edges, you can see the unevenness and slight parallelogram shape of the whole thing. This bugged me, but I think it looks good enough and so do my critics in the house. :-)

For the back of the cover, you need two rectangular pieces. Add 5 inches to one of the dimensions to create enough overlap for the envelope, then cut the fabric in half across the longer dimension. In this case, I knew I wanted my envelope flap to cut across the pillow horizontally, so I cut a rectangular piece of fabric that was 17" wide x 22" tall -- and then I cut this in half to get two rectangular pieces that were each 17" wide x 11" tall. Then I hemmed the 17" wide raw edges that would create the envelope. Here is the wrong side of my envelope flaps, hemmed and already overlapping:


To make the French seams, I pinned the two envelope flaps to the front piece, wrong sides together and aligning the raw edges. I sewed around the whole square with a 1/4" seam allowance. I trimmed the seam allowance to 1/8", trimming diagonally at the corners without cutting into the thread to reduce the bulk when turning the corners.


I flipped the cover wrong side out and I pressed (ironed) the edges, using my fingers (or you can use a dull pencil or a bodkin if you have one) to push out the fabric along the seams and at the corners to create sharp edges. I then stitched all around the cover with a 1/4" seam allowance.


I flipped out the cover to the right side and pressed the new edges, again using my fingers to create sharp edges. I stuffed the pillow in there and voila, it was done!

Earlier, I did a practice pillow using the fabric that my kiddo picked out himself when we went to Joann's around Valentine's Day. He said he liked this better than the Star Wars pillow. Well, what does he know? He's only 4, and addicted to chocolate. It is cute, though. :-)


xo, Gladys

Friday, May 18, 2012

Sewing: Oliver+S Art Smock

Another reason for my 2-week blogging hiatus is that I was working on more sewing projects. This one was an art smock for my dear friend E's older daughter for her 7th birthday. I used the pattern from the beautiful book Oliver + S Little Things to Sew.


I have to admit that I was a little intimidated by this book at first. I first learned about it on the blogs of some very experienced and talented sewists, so I felt that I might crash and burn when trying out one of the projects. The art smock is rated Advanced Beginner, just one step up from Beginner. Projects rated Advanced Beginner are "Suitable for someone who has sewn from a pattern before or has taken a few classes and completed several projects." While I haven't taken any classes (yet), I've definitely sewn from a pattern before and completed more than several projects (as seen from this blog).

Still, the art smock required French seams, which I'd never done before. There were also extra steps to create cleanly-hemmed pockets and elastic casing (at the neck). The directions for this kind of hemming confused me quite a bit, which took some time to figure out in the beginning because of the unclear wording. (Special thanks to my craftsy and technical-minded hubby for helping me conceptualize the pattern!) After cutting out the pieces, it took me many hours to finish, starting from the early afternoon through the wee hours of the morning (around 3:30 AM)...BUT! I honestly felt good during the process of construction. Once I figured out the special hemming, it was simply going through each step, moving from the ironing board to the sewing machine to the cutting mat/ruler and back again. Because I could see how beautiful it was coming together, I took special care to properly iron the fabric, ensure that my seams were as straight and even as possible, and analyze the directions carefully so as to avoid any mistakes. All of that took time. And by the end of the project, I felt a deep admiration for Liesl Gibson, the author of the book (turns out she got a degree from the Fashion Institute of Technology in NY and designed for fashion houses like Tommy Hilfiger and Ralph Lauren -- she's one talented designer). I'm looking forward to trying another project from the book!


The nice thing was that I was able to get the intended receiver to model it for me. Perfect fit. Also nice is the feeling that I am now officially an "advanced beginner" rather than just an "intermediate beginner"!

I learn at least one new thing with every project I've done so far. If you're interested, here are my random notes on the project. I left it at the end to avoid completely boring you. :-)
  • The directions for the pockets were confusing for me, but you're supposed to turn the corners inside out for a clean look. I had to do that twice throughout the construction, and once I figured it out, it was cool to see how cleverly the whole pattern was put together. Here's the wording for step #2: "Turn the pocket's resulting hem to the wrong side, and press it." What this means is that you turn the hem inside out so that the wrong sides of the hem are together. The same concept applies to creating the neckline in step #8: "Turn the bias strip and back plackets to the smock's wrong side, pushing out the corners at the back neckline." When it says "turn...to the wrong side," it means turn inside out (or I suppose "flip right side out" would be more accurate). Originally I assumed it meant folding to the wrong side, which is obviously completely wrong.
  • French seams take an extra step and therefore extra time, but the finished product is so clean -- the seams on the wrong side look as good as those on the right side (see the underarm seams above) -- and I felt really good while constructing the garment despite how long it took. The learning curve wasn't too grueling, but by the end I felt like the smock was the best thing I had ever made with my hands!
  • Another thing I learned is that it really pays to use the steam setting on your iron if you're working with 100% cotton. It made a huge difference this time, since smooth, flattened fabric makes for better handling.
  • Right before this project, I purchased a set of pattern weights, a disappearing ink pen, and an inexpensive 20-yard roll of 24-inch-wide tracing paper. All of these made drawing and cutting the pieces much less stressful than before, when I was taping together smaller pieces of tracing paper from a pad (ugh, so bothersome). The disappearing ink pen was fantastic for tracing the shape onto the fabric itself; it really made cutting the fabric -- arguably the most stressful part of the process -- much easier.
  • Finally, I realize that more and more, I enjoy working with strong geometrical shapes, particularly stripes. It actually makes construction easier, contrary to the advice I was given as a new beginner, since I can use the stripes as an extra guide while cutting or machining.
That's it! I have another (very fun) sewing project to share with you soon. In the meantime, have a great weekend!

xo, Gladys

Thursday, May 17, 2012

Fluevog Love in the Haight

During my early-May visit to the Bay Area, I of course had to include a stop at the Fluevog store on Haight Street with dear Joanne. I hadn't been to a Fluevog store to try on the latest Spring shoes, so this was the perfect opportunity to do just that. In particular, I'd been eying the new styles and colorways in the Miracle family. But I certainly couldn't stop at the Miracles. Here's what I ended up trying on (you can click on the photos to see the shoes on the Fluevog website):

Miracle: Hollie

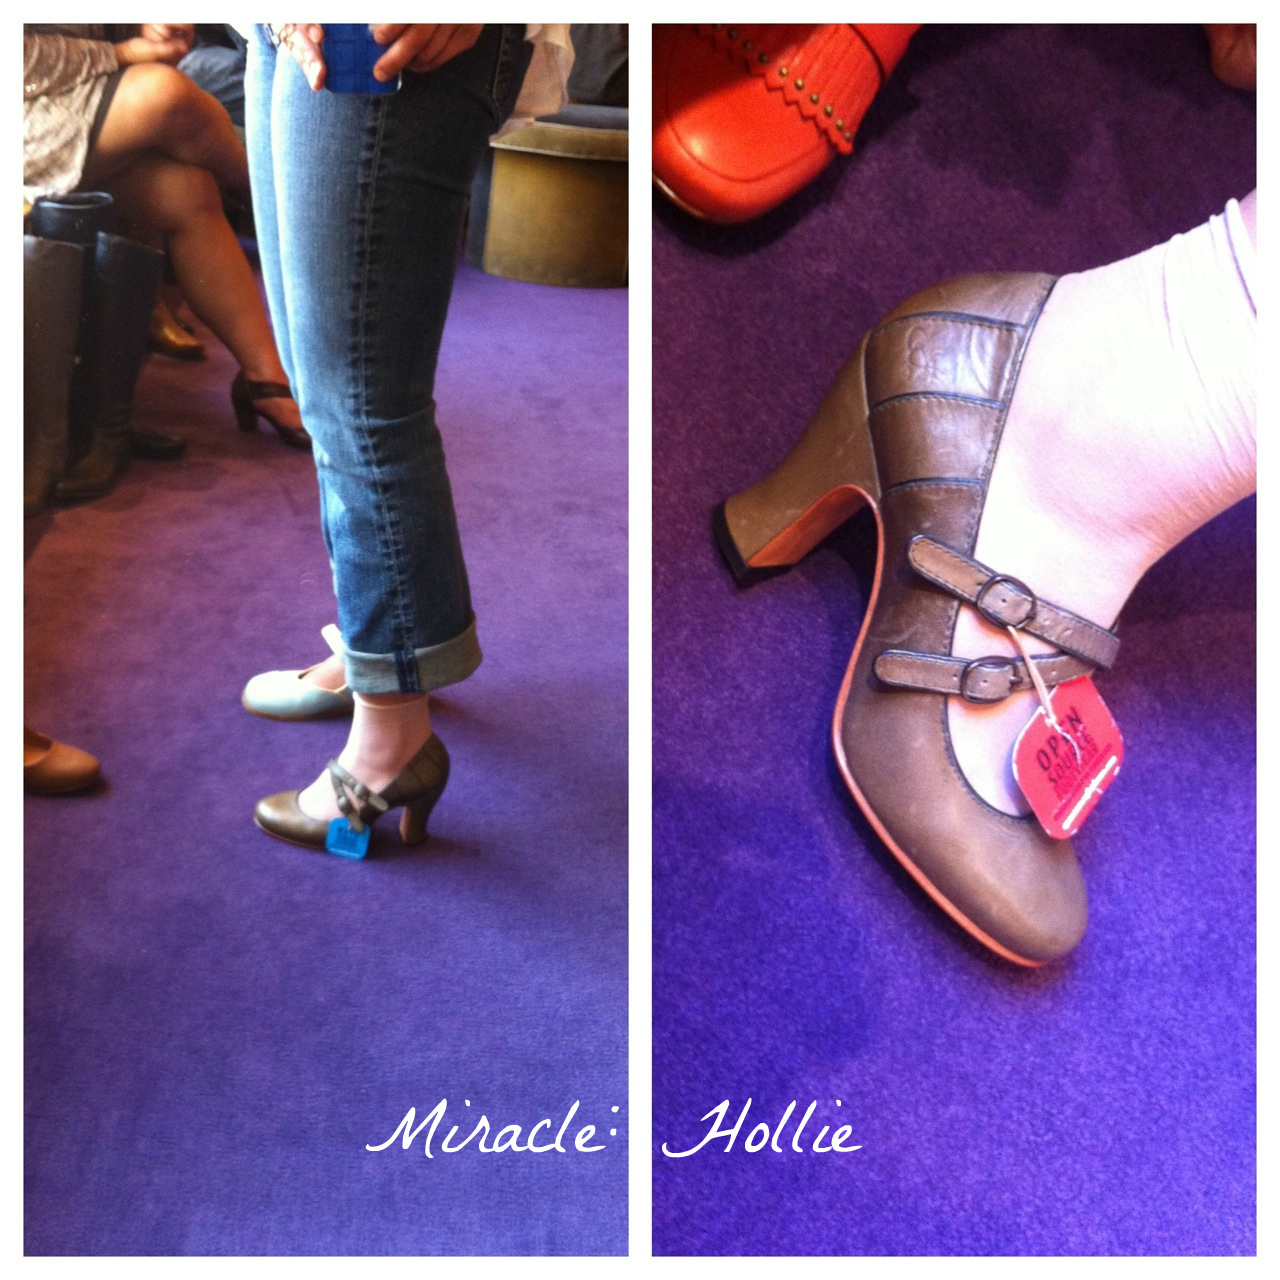
These are VERY cute but a little too high given the small toe box. My feet are widest at the toes so I can imagine they would be cramped there within an hour of wear.

Miracle: Medugorje

These pumps are in the same family as the Hollies above and have a gorgeous profile. But I have the same problem at the toe box since they're the same sole.

World: Nzame

These loafers are very comfy, but not interesting enough for me to spend that much money (even though this particular colorway is on sale).

Memories Hi: Keepsake

The silhouette of these shoes reminds me very much of the Attention family, and these definitely grab attention! There is a bit of a platform so they're not as steep as you would think, but they are still very high.

Integrity: Amie

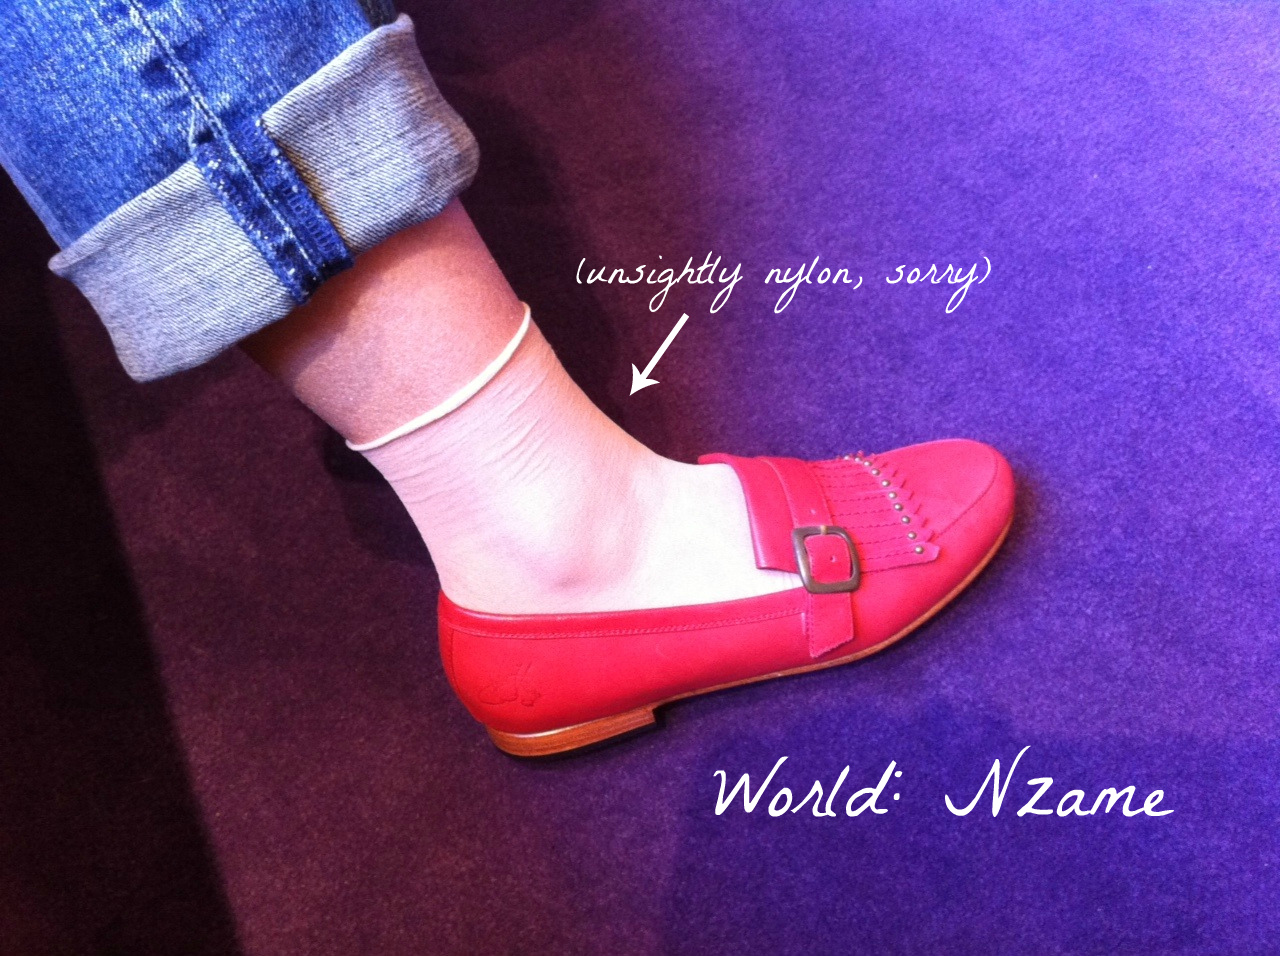
I've never seen Fluevog make ballet flats before, and I do like the fit and the leather very much. However, they are still ballet flats...I can't shell out that much money for ballet flats.

Wonder: Ayers

I think the Wonders make for a very comfortable shoe, and this particular style in that family is no exception. Despite my love for the color, however, the ankle straps add too much bulk in that area. With thick calves like mine, that's not an advantage.

Baroque: Caravaggio

The Baroque family has a really beautiful hexagonal heel. Unfortunately, the family runs too big for me. The bows on these t-straps are also not quite my style, anyway.

Daily Miracles: Prodigy

The Daily Miracles look very much like the Miracle family, but a little wider at the toe box which is helpful. These size 6 do fit me (yay!) but in the end I wasn't wowed by this particular sling-back style. I'm looking forward to the new styles that Fluevog comes up with for this family.

Bellevue: Etta Place

Ahhh, another beautiful Bellevue style. These were size 6 and still too large. I can't wait until they regularly start making Bellevues and Minis in size 5. (I was told size 5 Minis are coming this Fall!)

Faith Hi: Jericho

Trying this on was more of a gag than anything else. "Fluevogologist" Jim said that they've been making everyone try this style on this season. They're not even in my size! But it was fun to see my feet encased in such a loud shoe. And you know what, they're not that bad! (Of course, it helps that they're actually comfortable.)

Frontier: Danielson

These were the last pair I tried on, and I wouldn't have done so if Jim hadn't taken them from the back room to show me. I loved the color combo and style immediately: navy, sky, and red, with a red heart at the back of the heel.

And OK, I'll confess here that I did actually buy the Danielsons. I was going to wait until May 15 (International Fluevog Day) to get 15% off of a pair of shoes in the Miracle family, but I wasn't enamored with any of the Miracles I tried on...whereas the moment I put the Danielsons on, I didn't want to take them off. They are just so cute, comfortable, and easily styled as part of a '50s retro outfit, and no question that they add interest to my shoe collection in a way that heels/pumps won't. (Maybe one day I'll share my whole collection here so you'll know what I mean.) Thank goodness, at least, that the Danielsons were already on sale.

Many thanks to Joanne for taking the closeup shots of the shoes!

xo, Gladys

Wednesday, May 16, 2012

Bay Area Trip

Sorry for the radio silence the past couple of weeks but it's been a busy month. The first weekend of May, I drove up to the Bay Area (with my mom) to visit friends, then when I got home my laptop promptly gave me the black screen of death even though it had been fine during the trip. It's now fixed (for free!! thanks to the Apple Store for the lovely Mother's Day gift!) and ready for me to catch up on blogging, email, and, alas, bills.

Anyway, I totally forgot to bring my nice DSLR on my way out the door for the trip, but I have some iPhone shots of my very busy vacation.

We arrived in San Francisco on a Thursday afternoon, and a few hours later I was at the Castro in the same venue as the megastar band Journey. You know the songs "Open Arms," "Don't Stop Believing," and "Faithfully"? Yeah, that's them. The closing film of the San Francisco International Film Festival was the documentary, "Everyman's Journey," focusing on the band's search for and discovery of their new lead singer, who turned out to be Arnel Pineda, a Philippine national who has the most amazing voice. The guy is 44 and he sounds (and looks) like he's in his 20s. When I signed up to watch the film, I had no idea that the whole band would actually be there to watch with the rest of the audience and then give a Q&A afterward. It was an incredible treat! I even managed to catch some photos of Arnel and the band member who started Journey so long ago, Neal Schon. Plus, it was a fantastic film. Go see it when it comes out in theaters!


The next day I had lunch with a friend and former student at Patio Filipino, spent the afternoon with dear Joanne at the Fluevog store on Haight Street (she's one of my Fluevog "sisters" and we also call her our "pusher" ;-)), then had dinner with another old friend at Lime Tree, a hole-in-the-wall Singaporean restaurant, after which we caught an hour or so of the amazing Gaultier exhibit at the de Young Museum and then sang a few songs at a karaoke bar in Japantown. Whoa, I'm tired just writing that! I can't believe I did all that in one day. Anyhow, if you look closely, you'll catch Joanne in one of the pics below. And that's delicious garlic fried rice and chicken adobo in the food pic. (I wish I'd taken photos at the Lime Tree because it was also really delicious -- and very affordable!)


My Saturday was spent in Palo Alto and San Jose for a trip to the specialty spice store, Penzeys, and lunch with Joanne and another former student-turned-friend who goes to grad school in Santa Cruz. The Korean barbecue buffet was pretty delicious, and it was fun to cook the meats on our table. By the way, I really loved my outfit that day; I wore my new vintage-style ModCloth dress with my newest Fluevog boots, and they were a match made in heaven. Both prim and sassy, and boy did I feel tall in those shoes!


I capped off Saturday evening by going to see The Avengers with my mom and sister and HAD A BLAST. Even though we could only find seats on the side, with part of the stair banister blocking my view (thankfully it was an aisle seat so I was able to lean over to see the whole screen), I loved that film and have in fact seen it for a second time already. I was struck by how funny it was. The writing was really engrossing -- well, it is Joss Whedon after all -- but I was surprised at how deftly he directed all the amazing action scenes, many of which were funny. It was so exhilarating and JUST SO FUN. Whedon is a genius.

Sunday morning was time to get ready for the trip back home, but I managed to see Joanne and Dorothy in South San Francisco for a fun half hour before having brunch with my mom and sister for an early Mother's Day celebration. We went to La Mar, which had a wonderful view of the Bay. The food was very tasty, especially the appetizers we ordered (liver pâté and Japanese ceviche).


This was definitely one of the best trips I've ever had, but I have to admit that I was happy to be back home again with my guys.  :-)

xo, Gladys
Related Posts Plugin for WordPress, Blogger...