Showing posts with label OliverandS. Show all posts

Monday, December 30, 2013

Sewing: Oliver + S Reversible Bucket Hat, Take 2

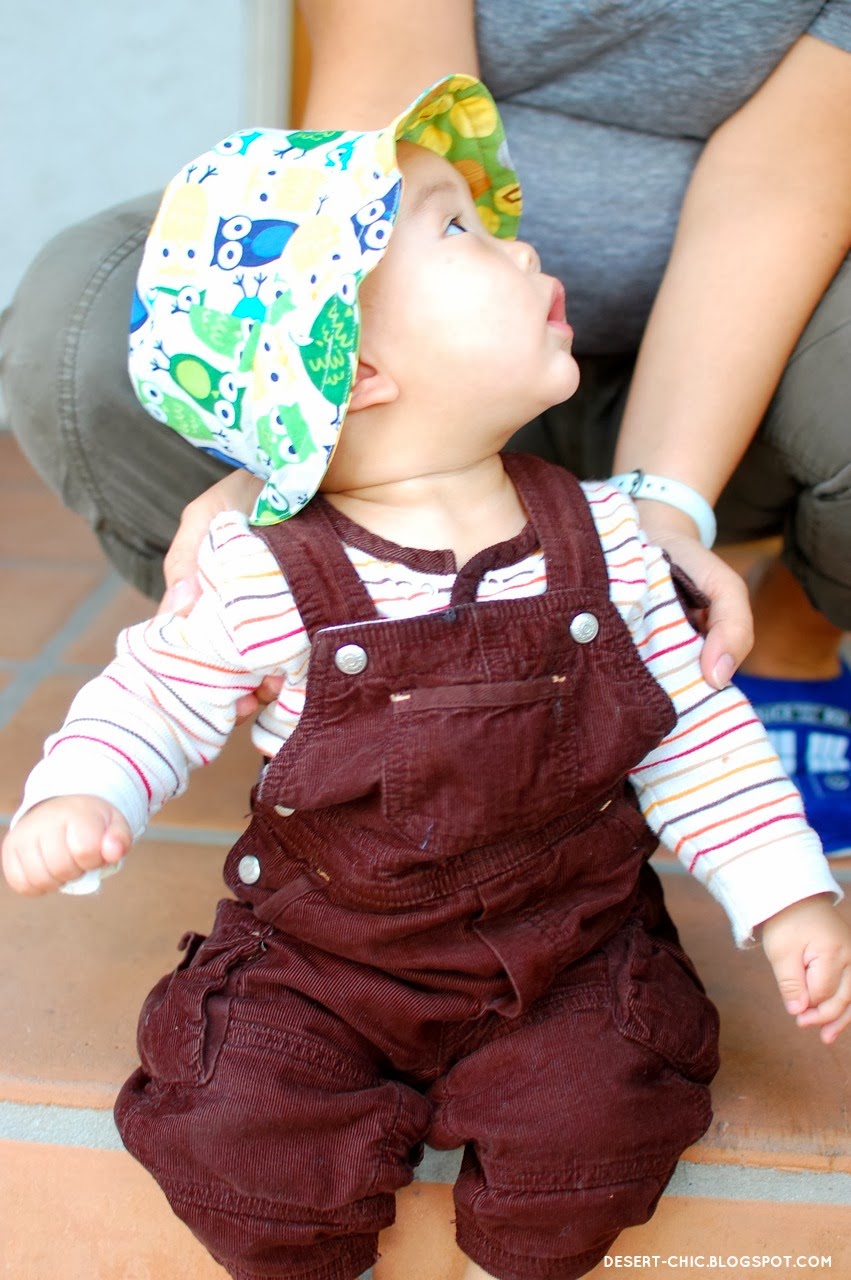
I didn't want to end the year without one last sewing project, and thankfully this one turned out okay so I can share it with you. Really, though, it's the model who's doing all the work here.


Even if a little blurry, isn't he utterly adorable? Those cheeks say hello!

This is my godson C wearing the reversible bucket hat that I made for him as one of his Christmas presents. If it looks familiar to longtime readers, it's because I have made this hat before -- from a free Oliver + S pattern available here -- and even used the same fabric for one of the sides (his mom picked the fabrics). This time around, however, I confess that I was pretty rusty due to not having sewn anything during the second half of the year. Sorry, C! Well, he doesn't really like the hat (yet), anyway. During the photoshoot, he kept taking it off -- hence the blurriness as I scrambled to take the photos in the waning light. His mom, my older sister, tried to help ... and I just wanted to point out the Doctor Who TARDIS slippers she's wearing in a couple of the photos -- another present from yours truly!

Speaking of which, I'll post some photos of our actual Xmas celebration, which sorta had a Doctor Who theme and made me seriously happy. And then there was the delicious food. And the adorable nephews. And the fun family conversations and music. I was in heaven!

Anyway, if you celebrate, I hope you had a wonderful holiday, too!

xo, Gladys

Monday, February 11, 2013

Sewing: Oliver + S Tote Redux

It was an unusually busy week for me last week, and only now do I feel like I can breathe deeply again. In between various errands, dental appointments, impromptu babysitting, an appointment with an accountant, a birthday lunch, a birthday party, and a school field trip with my son, I managed to squeeze in some time for a couple of sewing projects. Here's one of them, an Oliver + S Mother-Daughter tote (free pattern) for my niece's 8th birthday.


If that sounds familiar, it's because I used this same pattern before to make totes for my 9-year-old twin nieces last fall (all three young ladies are cousins). Here's the purple tote:


As you can see, I tweaked the pattern by using one large stripe for the middle instead of two smaller ones, and using the same complementary solid-color fabric for the bottom, top stripe, and handles. While I loved the original patchwork feel, I was going for a different, more elegant look. I was inspired by the dragonfly/butterfly fabric and knew that I couldn't simply use it as an unrecognizable stripe on the tote. So instead I decided to "frame" it and make it the centerpiece. (If you're interested in how I dealt with the dimensions, I simply added the height dimensions of the two middle stripes, from 3.25 inches each to one larger piece that was 6.5 inches. The height dimension of the lining had to be increased two inches to 23 inches. The rest of the dimensions remained the same, but the change resulted in a slightly taller tote than the original.) I think the tote turned out wonderfully, and this time around I was more meticulous about cutting the pieces and doing any necessary trimming as I went along so that the seam edges matched as closely as possible (though unfortunately still not perfect).


Here's a closeup of the awesome dragonfly/butterfly fabric, superimposed with different handwritten designs appearing to be the work of a natural historian or entomologist. The fabric design is both lovely and intellectual, and I thought it would be appropriate for a youngster who is exceedingly bright.


I don't have a photo of the inside lining, but for some fun I used this colorful stripey fabric which might look familiar to long-time readers. I used the same fabric to make an art smock from another Oliver + S pattern last summer. For this tote, I had the stripes going horizontally since it looked better that way. I wanted to use a colorful fabric for the lining because I personally get a kick out of seeing polka-dotted or brightly-colored linings in elegant leather purses or wallets. The contrast makes me feel like I've got a fun little secret, like when I wear bright patterned socks underneath pants or boots. Just one of the things that float my boat. :-)


xo, Gladys

Wednesday, September 12, 2012

Sewing: Cupcake Apron

When one of my dearest friends left California to start a job in Arizona, I knew that I had to make her an apron as a housewarming present. Joanne (with whom I collaborated on the DIY sweaty bands project) loves cupcakes and the color purple, so they were the inspiration for the fabric used in this reversible apron pattern by Lotta Jansdotter (not free, but it's from a lovely book filled with some great non-clothing sewing patterns).


This apron has a wonderful A-line shape when worn, even though the actual shape curves in lots of places. It also has an unexpected pleat detail at the shoulder straps. Anyway, I'll be shipping the apron to Joanne today, and I hope she likes it. I'm a little sad to see it go, myself. I'd make one for me but I've already got too many aprons as it is.


Process notes:

The pattern suggests some simple appliqués, but I opted instead to make two pockets on each side -- they're more useful, and Joanne loves pockets as much as I do. I made them a little deep so that they can carry cooking utensils if necessary. To make the pockets, I used the nifty technique I learned when making the Oliver + S art smock, which produces clean- and professional-looking pockets, IMO.

Measuring and cutting took the most time for this project, and the pockets added some time as well. If you want to just whip this out quickly, you could probably do so by cutting out the appliqué/pocket step and maybe the pleating as well. The pleat didn't seem to add a lot to the finished product but was probably the most finicky step. (You'd need to edit the pattern a bit in this case; just narrow the shoulder to match the width of the ties, which is a little over an inch.)

Also, I would suggest putting the markings on the right side of the fabric to facilitate the process (I put the markings on the wrong side and had to flip back and forth quite a bit), as well as pressing all 1/2" seams open. Doing the latter made it much easier to iron the apron flat at the edges after turning it right-side out (the two sides were sewn together with right sides facing so as to create finished edges once the apron was turned right-side out).

Have a knitting needle or something dull but pointy ready at hand. I used it the sharpen the corners for the straps and the pockets, and the edges of the apron body.

Final verdict? I didn't learn anything particularly new during this project, although I revisited pleats again. The weakest part of the pattern is probably the pleats at the shoulder straps; more detail in both the instructions and the markings on the pattern would have been helpful. As it is, I'm not sure I did it correctly, but it looks fine anyway. Overall it was an enjoyable experience. It's a great pattern with a great-looking finished product, which makes it much like an Oliver + S pattern. 


xo, Gladys

Wednesday, September 5, 2012

Sewing: Oliver + S Mother-Daughter Totes

I sewed up a couple of multi-fabric tote bags for my identical twin nieces' upcoming birthday celebration. The pattern I used is another FREE pattern from the fabulous Oliver + S. For the first niece, I used different fabrics in her favorite color pink with a plain pink inside lining:


And purples and blues for the second niece, with the most adorable owls inside to make up for the plainer designs outside:


Process notes:

These totes took me longer than expected to make -- not including the time it took to choose and buy the fabrics, then wash/dry and iron them. In addition to cutting out several pieces from many different fabrics (for each tote: 5 different fabrics plus interfacing), I also needed to prep the fabrics with the fusible interfacing before I could start sewing. The interfacing I bought required steam-ironing using a dampened press cloth or ironing cloth. All in all, the cutting took over three hours, pressing the interfacing took about two, then sewing each tote took two to three hours. My least favorite part was the measuring and cutting, and many of the pieces ended up with slightly-off measurements, ending up as parallelograms or trapezoids instead of perfect rectangles. Unfortunately, although they didn't ruin the totes, those slight mis-measurements showed up in the finished product when some of the stripes didn't match up exactly. :-( It's possible to straighten them out while sewing each stripe on by measuring and trimming as you sew, then also trimming the lining to match the new measurements of the outside bag. I didn't do a very diligent job of that on my first tote. Oh well.

Also, I wish I'd known ahead of time that I needed to cut the interfacing 1/8" smaller all around which would have saved me the time it took to trim down each piece of interfacing while I was ironing them on. So be warned.

These tote bags are definitely not perfect, but if you don't look too closely they're cute and they'll do the job they're made for, which is toting your stuff around. All of that interfacing makes for very sturdy straps, pocket, and outside bag. My favorite is the purple and blue with the owls inside. :-)

xo, Gladys

Thursday, August 2, 2012

Sewing Tutorials Roundup

If you're on Pinterest, you might have exponentially increased your to-do list like I have. Over the past couple of months, I've accumulated links to some awesome sewing tutorials that I want to try by the end of summer. Thought I'd share some of them here, in case you're in need of inspiration and encouragement during these "dog days." Just click on the photos to go to the tutorials.


I want to make these adorable newborn pants for my brother's twin boys who are due to be born in late September.


Here's another project I want to do for my twin nephews. I think I'll have to make two!


I love the idea of these fruit stripe skirts, and I'm thinking the watermelon skirt will be the first one I try.


Although I don't like the idea of cutting into perfectly good pillowcases, this tote bag made from a pillowcase would be great if I could find a pillowcase pattern that I really loved.


I'd like to try out this hemming/finishing method, called a lettuce hem, on a quick skirt using my sewing machine (no serger here).


This is a cute and free pattern + tutorial for a shirt or dress for a 12-18 month toddler (girl). I don't know any kids that age currently, but I'm going to make this anyway! I think I'll use two different fabrics for the circle neck and the body.


And finally, here are a couple of links to sewing roundups:

Happy sewing!

xo, Gladys

Wednesday, August 1, 2012

Sewing: Oliver + S Reversible Bucket Hat

This adorable baby says Happy August! (Can you believe it's August already? Summer is almost over. *tear*)

Anyway, here's one of my latest sewing projects, a reversible bucket hat made from an Oliver + S pattern. I may have written this on the blog before, but I love Oliver + S. And lucky for you, this is a FREE pattern! It's actually in the Little Things to Sew book that I own, but I liked printing it out from the PDF then simply cutting out the size I needed. Saved me from having to trace out the pattern and then having to cut THAT out.


I used two quilt-weight fabrics, but the hat felt almost like canvas once it was put together. And there's only one layer of interfacing in between the two brims. Amazing.

I started this pattern the night before I planned to give it as a gift to adorable baby N, so I did have to pull an all-nighter to finish it. (This is definitely my M.O. -- I was a master of the last-minute essay in college and grad school.) However, again I had a pretty good time constructing from the pattern. I also saved some time by following the instructions from this no-hand-stitching hack developed by Jessica of A Little Gray. The hardest part was probably deciding on which fabrics to use.

The pattern calls for sewing on a curve, which was the most difficult part for me. It requires clipping into seam allowances. If this method is new to you as well, I would suggest 1) being careful and even when clipping into the seam allowance (at least three clips per quadrant and almost all the way to the seam allowance) and 2) pinning closely together.

I think this hat is super fun and will likely make another one soon. Lots of babies and kids in my life right now!

xo, Gladys

Friday, May 18, 2012

Sewing: Oliver+S Art Smock

Another reason for my 2-week blogging hiatus is that I was working on more sewing projects. This one was an art smock for my dear friend E's older daughter for her 7th birthday. I used the pattern from the beautiful book Oliver + S Little Things to Sew.


I have to admit that I was a little intimidated by this book at first. I first learned about it on the blogs of some very experienced and talented sewists, so I felt that I might crash and burn when trying out one of the projects. The art smock is rated Advanced Beginner, just one step up from Beginner. Projects rated Advanced Beginner are "Suitable for someone who has sewn from a pattern before or has taken a few classes and completed several projects." While I haven't taken any classes (yet), I've definitely sewn from a pattern before and completed more than several projects (as seen from this blog).

Still, the art smock required French seams, which I'd never done before. There were also extra steps to create cleanly-hemmed pockets and elastic casing (at the neck). The directions for this kind of hemming confused me quite a bit, which took some time to figure out in the beginning because of the unclear wording. (Special thanks to my craftsy and technical-minded hubby for helping me conceptualize the pattern!) After cutting out the pieces, it took me many hours to finish, starting from the early afternoon through the wee hours of the morning (around 3:30 AM)...BUT! I honestly felt good during the process of construction. Once I figured out the special hemming, it was simply going through each step, moving from the ironing board to the sewing machine to the cutting mat/ruler and back again. Because I could see how beautiful it was coming together, I took special care to properly iron the fabric, ensure that my seams were as straight and even as possible, and analyze the directions carefully so as to avoid any mistakes. All of that took time. And by the end of the project, I felt a deep admiration for Liesl Gibson, the author of the book (turns out she got a degree from the Fashion Institute of Technology in NY and designed for fashion houses like Tommy Hilfiger and Ralph Lauren -- she's one talented designer). I'm looking forward to trying another project from the book!


The nice thing was that I was able to get the intended receiver to model it for me. Perfect fit. Also nice is the feeling that I am now officially an "advanced beginner" rather than just an "intermediate beginner"!

I learn at least one new thing with every project I've done so far. If you're interested, here are my random notes on the project. I left it at the end to avoid completely boring you. :-)
  • The directions for the pockets were confusing for me, but you're supposed to turn the corners inside out for a clean look. I had to do that twice throughout the construction, and once I figured it out, it was cool to see how cleverly the whole pattern was put together. Here's the wording for step #2: "Turn the pocket's resulting hem to the wrong side, and press it." What this means is that you turn the hem inside out so that the wrong sides of the hem are together. The same concept applies to creating the neckline in step #8: "Turn the bias strip and back plackets to the smock's wrong side, pushing out the corners at the back neckline." When it says "turn...to the wrong side," it means turn inside out (or I suppose "flip right side out" would be more accurate). Originally I assumed it meant folding to the wrong side, which is obviously completely wrong.
  • French seams take an extra step and therefore extra time, but the finished product is so clean -- the seams on the wrong side look as good as those on the right side (see the underarm seams above) -- and I felt really good while constructing the garment despite how long it took. The learning curve wasn't too grueling, but by the end I felt like the smock was the best thing I had ever made with my hands!
  • Another thing I learned is that it really pays to use the steam setting on your iron if you're working with 100% cotton. It made a huge difference this time, since smooth, flattened fabric makes for better handling.
  • Right before this project, I purchased a set of pattern weights, a disappearing ink pen, and an inexpensive 20-yard roll of 24-inch-wide tracing paper. All of these made drawing and cutting the pieces much less stressful than before, when I was taping together smaller pieces of tracing paper from a pad (ugh, so bothersome). The disappearing ink pen was fantastic for tracing the shape onto the fabric itself; it really made cutting the fabric -- arguably the most stressful part of the process -- much easier.
  • Finally, I realize that more and more, I enjoy working with strong geometrical shapes, particularly stripes. It actually makes construction easier, contrary to the advice I was given as a new beginner, since I can use the stripes as an extra guide while cutting or machining.
That's it! I have another (very fun) sewing project to share with you soon. In the meantime, have a great weekend!

xo, Gladys
Related Posts Plugin for WordPress, Blogger...